Help pages
Example: First Hebrew exercise
Example: Second Hebrew exercise
Example: Third Hebrew exercise
Example: Second Greek exercise
Example: Create a simple Hebrew exercise
Example: Create an advanced Hebrew exercise
Example: Create a simple Greek exercise
Andrews University Final Exam: Hebrew I (OTST551)
Andrews University Final Exam: Hebrew II (OTST552)
Andrews University Final Exam: Advanced Hebrew (OTST625)
Andrews University Hebrew Placement Exam
Hebrew Proficiency Exam for OTST Exegesis classes
Andrews University Final Exam: Intermediate Greek (NTST552)
Andrews University Greek Placement Exam
Example: Create a Simple Hebrew Exercise
(You may be interested in a corresponding Greek exercise.)
We shall create an exercise in the conjugation of Hebrew verbs in the qatal form of the qal stem. We shall ask the user to identify the person, gender, and number of the qatal forms of various qal verbs.
Select the menu Administration > Manage exercises, then navigate to a folder where you want to create your exercises. This should preferably be a folder used only by you and your team. At the bottom of the page, click the Create exercise button. A dialog will appear in which you select the text database (corpus) on which you want to base your exercise. Here, you should select “Hebrew (ETCBC4, OT)” and press the OK button.
You will now see a web page that looks like this:
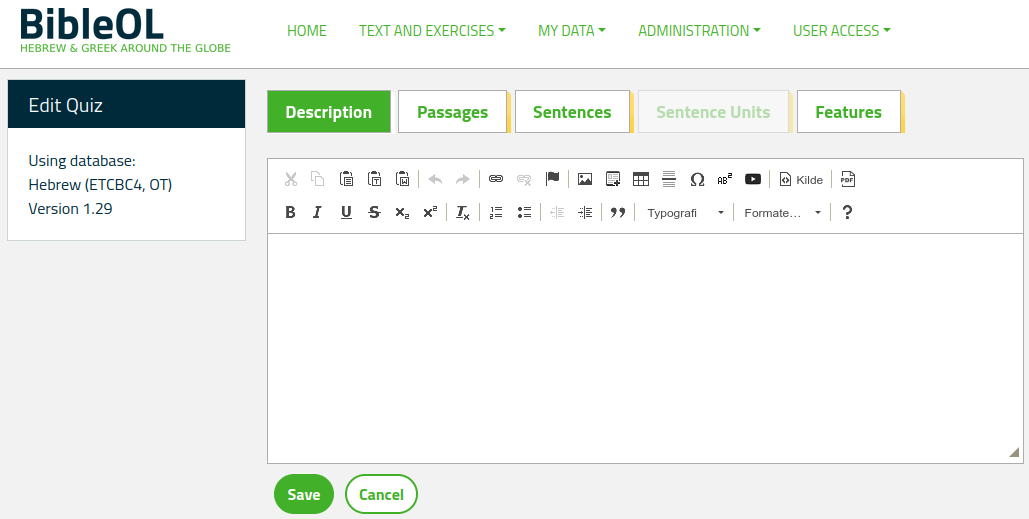
At the top you’ll see five tabs, labelled “Description”, “Passages”, “Sentences”, “Sentence Units”, and “Features”. On the left, you can see the name of the text database you’re using.
The “Description” Tab
The “Description” tab is displayed when you start editing an exercise. Below the row of tabs, you see a text editing field in which you can write information and instructions to the students who will be running this exercise. You may, for example, write something like this:

You can read more about the description tab here.
The “Passages” Tab
Select the “Passages” tab and indicate which part of the Old Testament you want to use for the exercise:
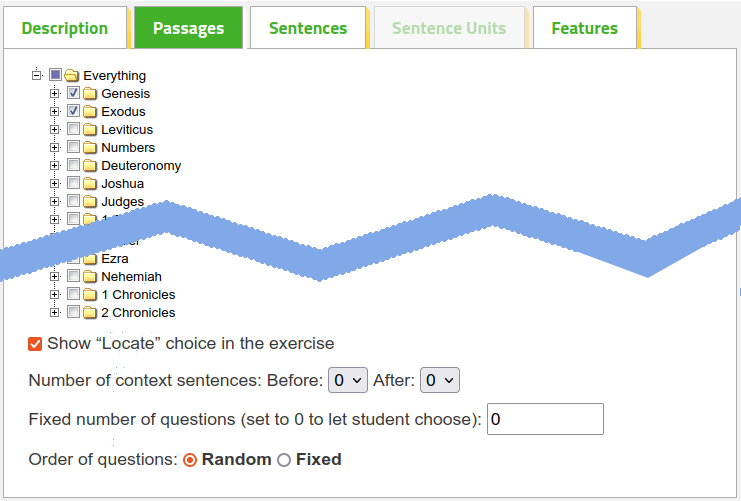
When generating questions for a student, Bible OL will choose sentences from the passages you specify here. The more passages you select, the more sentences Bible OL can choose from; but the more sentences there are, the longer it will take the program to generate the exercise. Therefore it may be a good idea to limit the selection. In most situations a selection comprising the entire New Testament is no problem; but if the selection contains the entire Old Testament, the program may appear somewhat slow.
The passages you specify here are, in general, only a suggestion for the student; as described under Example: First Hebrew Exercise, the student can normally use another passage selection by starting an exercise from the “Select number of questions and specify your own passages” column.
You can click on the small plus signs next to the names of the books of the Bible. This will allow you to specify individual chapters or verses to use for the exercise.
You can read more about the passages tab here.
The “Sentences” Tab
Select the “Sentences” tab. You will see a dialog like this one:
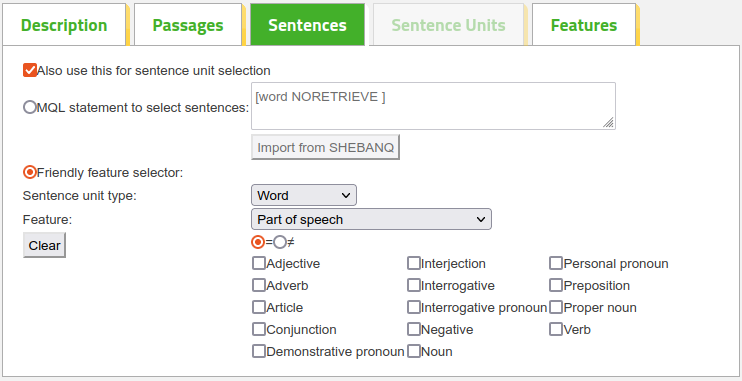
Here you can indicate the criteria which the program is to use when choosing sentences for the exercise.
We shall return to the first two lines (“Use this for sentence unit selection” and “MQL statement to select sentences”) later. Make sure that “Friendly feature selector” is marked.
Next to “Sentence unit type” there is a drop-down list where you can choose between the types of sentence units available for exercises in this database. These are “Word”, “Subphrase”, “Phrase atom”, “Phrase”, “Clause atom”, and “Clause”. Here you select the type of object that the exercise should be about. In most cases the value should be “Word”.
Next to “Feature” there is another drop-down list. Here you can choose between the various features available for the selected sentence unit type. For words, the features include “Part of speech”, “Gender”, “Number” etc. Try selecting various features and note how the rest of the window changes. When you choose a particular feature, Bible OL shows you the values that this feature may have. Finally press the “Clear” button.
The “Clear” button erases all the criteria.
For the exercise we are creating here, we need sentences containing words that...
- ...are verbs,
- ...have the stem qal,
- ...are in the qatal tense.
This can be specified thus:
- Set “Sentence unit type” to “Word”.
- Select the feature “Part of speech” and check the box next to “Verb”.
- Select the feature “Stem” and check the box next to “Qal”.
- Select the feature “Tense” and check the box next to “Qatal (Perf)”.
(Actually, in this example it is superfluous to require that the word should be a verb; if a word is marked as qal perfect, it is always a verb.)
The window now looks like this:
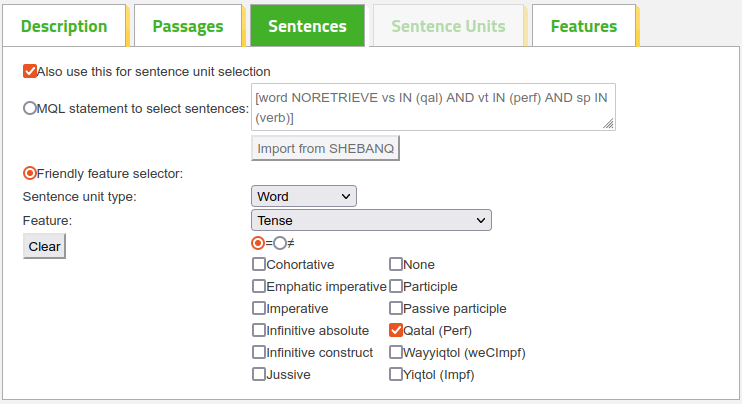
(You may have noticed that as you chose feature values, the text next to “MQL statement to select sentences” changed automatically. MQL is a command language that is used to specify how to search the database, and the statement here is the one actually used for your search. But feel free to ignore this for now. You may later read more about MQL.)
Bible OL now knows how to find sentences for the exercises. It will choose the sentences based on the criteria we have just specified. But now things get a bit more complicated: When Bible OL generates exercises, it actually has to make two choices: First it must choose some interesting sentences; thereafter it must choose some interesting sentence units (words) within the chosen sentences.
Often, the criteria used for these two choices are the same. In the current example, this is indeed the case: First, we want to search the database for sentences that contain qal qatal verbs; thereafter, we want to search each sentence for words that are qal qatal verbs. So in this example, the words have to be chosen using exactly the same criteria as the sentences. The check mark next to “Use this for sentence unit selection” instructs Bible OL to use the same criteria when selecting the interesting words. Try removing the check mark next to “Use this for sentence unit selection” and the set it again; you will then see that the “Sentence Units” tab is only active when the check mark is not set. (Be sure to leave the mark on.)
You can read more about the sentences tab here.
The “Features” Tab
Select the “Features” tab. You will see a dialog like this one:
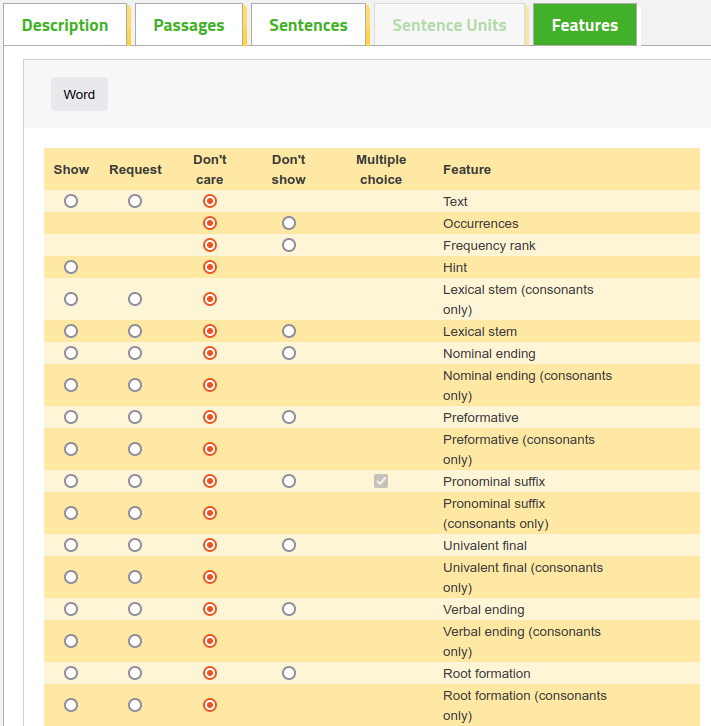
Here you can indicate what information you will provide to the student, and what information the student should provide.
When you first open this tab, all the marks will be in the “Don’t care” column. In the rightmost column you will see all the features that are available for the sentence unit called “Word” in this database. The first feature is always “Text” and represents the actual word in the Bible verse.
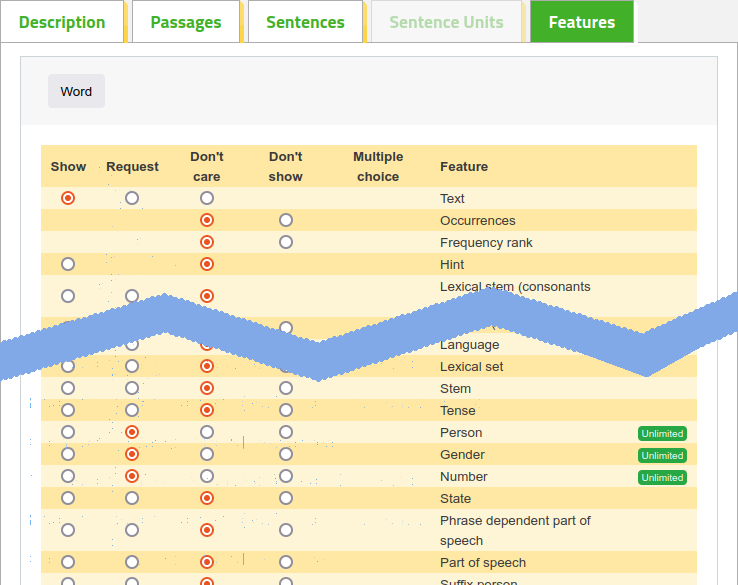
You can now choose which features to show to the student and which features the student must provide. In this example we want to show the actual word and ask the student to identify its gender, person, and number. Place a mark in the column “Show” next to “Text” and in the column “Request” next to “Person”, “Gender”, and “Number” as shown here:
When students run the exercise, they will be able to display all the features by pointing to the individual words with their mouse. If you want to prevent students from seeing certain features, indicate that in the “Don’t show” column. The “Request” features are never visible to the students.
A few of the features allow you to tick the “Multiple choice” column. If you do so, Bible OL will provide the student with a menu of choices for that feature; if you remove the tick under “Multiple choice”, the student must type the answer as text.
You can read more about the features tab here.
Saving the Exercise
Click the “Save” button at the bottom of the page to save the exercise. You will be asked to provide a name for the exercise.
Running and Refining the Exercise
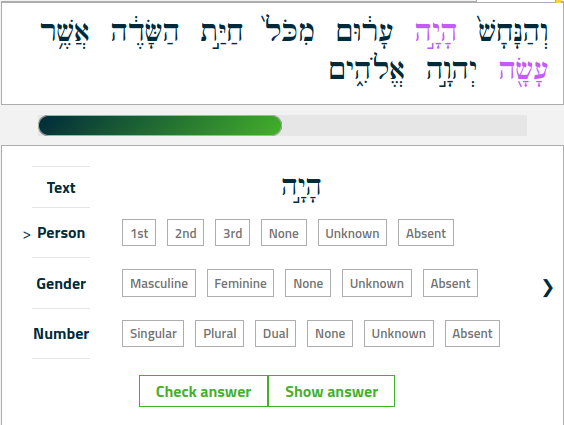
Go to the Text and Exercise > Exercises menu and find the exercise you just created. You can now run it by clicking, for example, on the number 5 under the heading Select number of questions using preset passages. You may then, for example, get this sentence from Genesis 3:1:
The correct answer (to both verbs in this sentence) is:
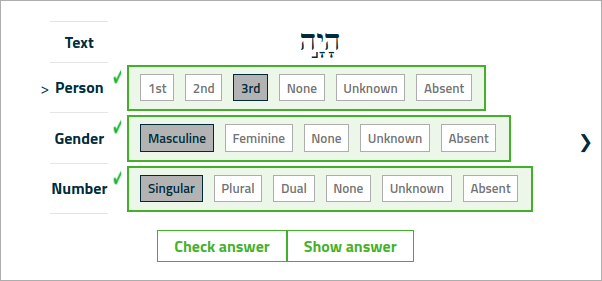
In fact, third person masculine singular is the answer to most questions posed by this exercise, simply because third person masculine singular is the most common qatal form in the Old Testament. This illustrates a feature of Bible OL which is both a strength and a weakness: The most common word forms in the Bible also become the most common word forms in the exercises. This is an advantage since the program will then primarily drill students in the forms they will need most often; but it is a drawback if the student is well acquainted with the common word forms and needs to train the less frequent ones.
We shall now change the exercise so that other verb forms will appear more frequently. We can do this by changing the search criteria so that the program will only look for sentences containing verb forms that are not in the third person.
Go back to the Administration > Manage exercises menu, locate your exercise and click the “Edit” button next to it. You can now change the exercise. Select the “Sentences” tab and select the feature “Person”. In the box under the feature selector you must now indicate that you are not interested in the third person. You can do this in two different ways:
- You can check both “1st” and “2nd”. This will cause Bible OL to look for words in the first or second person only.
- Alternatively, you can change the mark at the top of the box from = (equal to) to ≠ (different from) and then check “3rd”. This will cause Bible OL to look for words that are not in the third person. You can see this below:
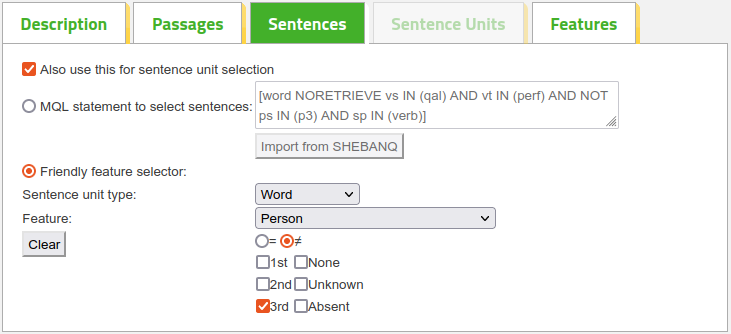
If you run the exercise now, the program will choose sentences with verbs in the first or second person qal qatal.
You may wonder about the terms “None” and “Unknown” in the figure above. The Hebrew database uses “None” for words where the feature makes no sense. For example, it makes no sense to ask if prepositions are the first, second, or third person. The value “Unknown” is used in cases where the word has a person, but you cannot tell from the text which person it is.
If you are interested, you may proceed to a more advanced version of this exercise.