Help pages
Example: First Hebrew exercise
Example: Second Hebrew exercise
Example: Third Hebrew exercise
Example: Second Greek exercise
Class management
Example: Create a simple Hebrew exercise
Example: Create an advanced Hebrew exercise
Example: Create a simple Greek exercise
Andrews University Final Exam: Hebrew I (OTST551)
Andrews University Final Exam: Hebrew II (OTST552)
Andrews University Final Exam: Advanced Hebrew (OTST625)
Andrews University Hebrew Placement Exam
Hebrew Proficiency Exam for OTST Exegesis classes
Andrews University Final Exam: Intermediate Greek (NTST552)
Andrews University Greek Placement Exam
Class Management
Classes serve a double purpose in Bible OL: Firstly, class membership controls access to collections of exercises. Exercises are stored in a hierarchy of folders, and access the contents of a folder can be restricted to students enrolled in a particular class. Secondly, teachers can monitor the students enrolled in a class and gather statistics about how each student is progressing.
To open class management, select Administration > Classes. You will then see a table that looks something like this:

Here you see a list of all the classes that exist in the system. We assume that you are Lilian Lane. You are listed as the owner of the class “Greek part 1”. Your colleague Andy Anderson is the owner of the two Hebrew classes.
Adding a New Class
To add a new class, click the “Add new class” button. You will then see this dialog:
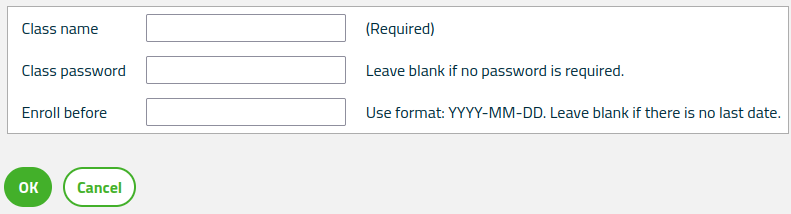
Enter this information about your new class:
- Class name – Choose a useful description of your class.
- Class password – This field is optional. If you write a text here, students must know that password in order to enroll in the class.
- Enroll before – This field is optional. If you specify a date here, enrollments after that date will not be accepted.
When you press “OK”, your class will be created:
Operations on an Existing Class
In the table of classes, you'll find three or four buttons under the heading “Operations”:
- Assign users – Here you can assign or remove students to your class. See below.
- Edit – This lets you modify the name, password and enrollment deadline of your class.
- Delete – This deletes your class.
- Change owner – (Available only if you have sysadmin privileges.) Allows you to transfer ownership of a class from one teacher to another.
Normally, you can only modify classes you own, but if you have sysadmin privileges, you can modify any class in the system.
Enrolling Students
There are three ways to enroll students in a class: The students can enroll themselves, or the teacher can enroll them through the Class Management menu discussed here or through the User Management menu.
If you want to prevent students from enrolling themselves, you have two options:
- Specify a class password, but don’t tell it to the students. In this case, potential students will be able to see that your class is available, but they can’t enroll themselves.
- Specify an “Enroll before” date in the past. In this case, potential students will not be able to see that your class is available.
To enroll students in your class using the menu we are discussing here, press the “Assign users” button. This will show you a list of all users. (This can be a very long list indeed.) Here you can add or remove students from your class. The “Enroll before” date does not affect your ability to enroll students in your own class.